Every mix engineer has a checklist — a set of principles they return to on every session. After years of mixing records professionally, these are the 10 rules I never break. We call them The 10 Commandments at Doctor Mix, and when followed properly, they will dramatically improve your sound.
Whether you’re working in a bedroom studio or a professional facility, these fundamentals apply. Read the full breakdown below, or watch the video.
1. Do Your Gain Staging
Always leave enough headroom when recording, and don’t max out channels when mixing. Digital clipping is unforgiving, and running your mix bus hot leaves no room for the mastering engineer to work. Aim for peaks around -6dB on your master bus — this gives you headroom without sacrificing signal quality.

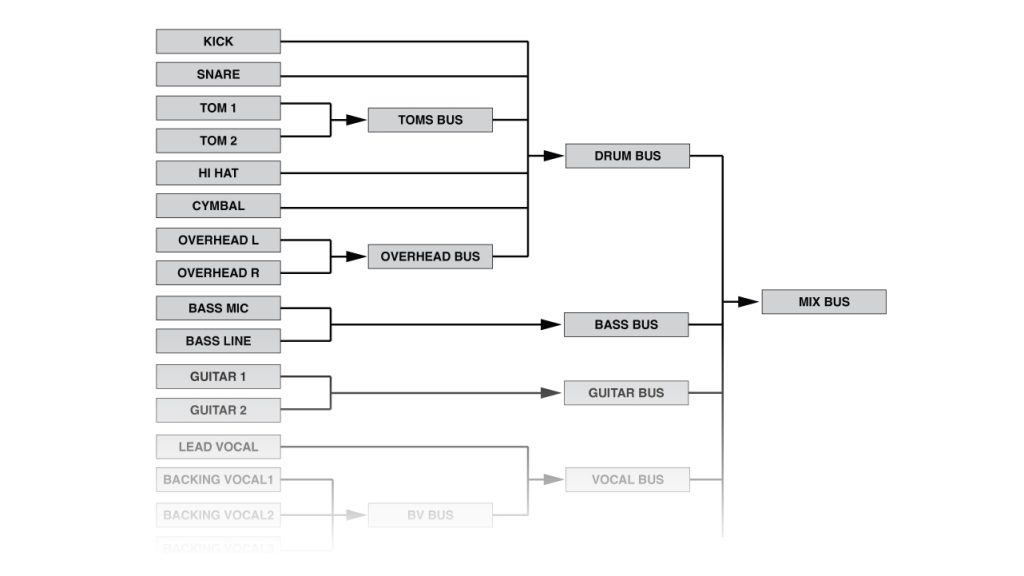
2. Do Your Bus Routing
Divide your arrangement into logical groups — drums in one bus, guitars in another, vocals in another, synths in another — and route them accordingly. This gives you macro-level control over your mix balance and makes processing much more manageable. It’s the foundation of an organised, professional workflow. Read more in our bus routing guide.
3. Compress in Stages
Compressors don’t like to work too hard. Unless you’re deliberately going for a crushed, hyper-compressed effect, you should always compress in stages. Instead of slamming a single compressor with 15dB of gain reduction, use 3–4dB on the channel, another 2–3dB on the group bus, and a touch on the mix bus. Each compressor does less work, and the result sounds far more natural and controlled. This is probably the single most important technique for making mixes sound professional. Learn more about how audio compression works and parallel compression.

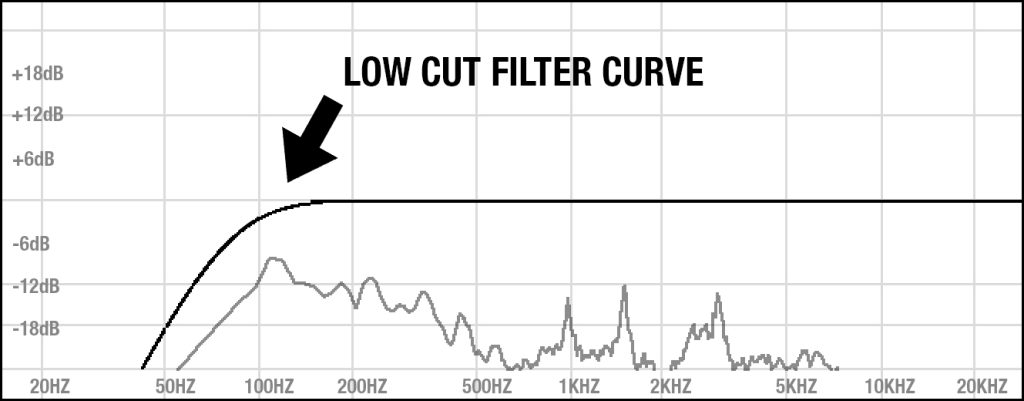
4. Filter Out Unwanted Frequencies
Every channel in your mix contains frequencies you don’t need. A tambourine doesn’t need low end. A bass guitar doesn’t need anything above 5kHz in most cases. Use high-pass and low-pass filters aggressively to clean up each track. This removes hidden noise and rumble that eats headroom, and gives your kick drum and bass the space they need to breathe.
5. Use Gear and Plugins to Give Character
EQ and compression aren’t just corrective tools — they’re creative ones. A Neve-style EQ adds a different colour than a clean digital one. A tube compressor (like an 1176 or LA-2A) adds warmth and character that a transparent compressor won’t. Use these differences intentionally. It’s this character that makes your mixes sound unique rather than clinical.
6. Sort Out the Low End
Decide which instruments own the low end. In most mixes, that’s the kick drum and bass — and even those two need their own space. Use EQ carving and sidechain compression to prevent them from fighting each other. A cluttered low end is the number one reason home mixes sound amateur. Read our guide on making the kick drum punchy for specific techniques.

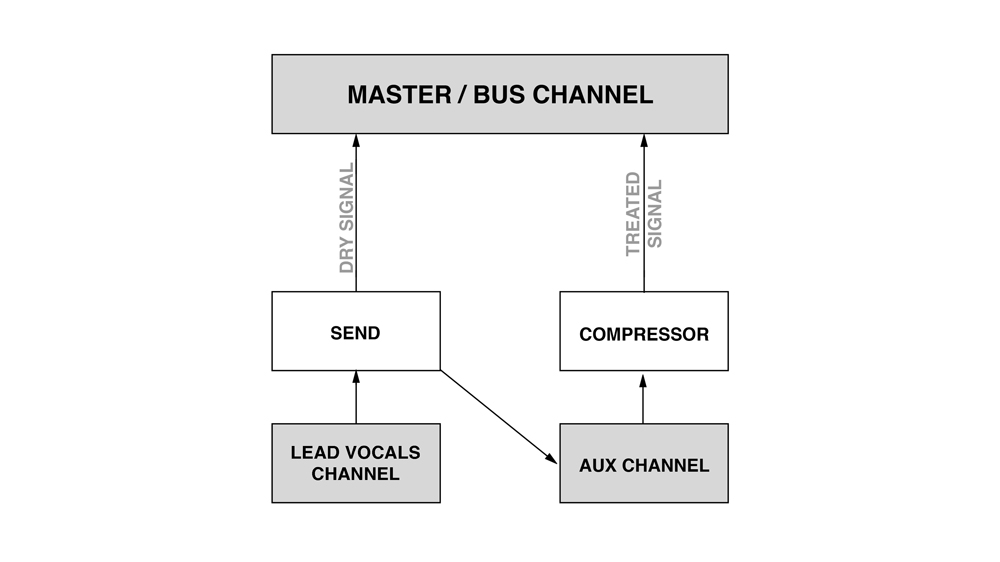
7. Use Parallel Compression
This technique changed my mixing forever. Duplicate an important track, compress the copy heavily, and blend it back with the original. You get the punch and presence of heavy compression without sacrificing the dynamics and life of the original performance. It works brilliantly on drums, vocals, and bass. Read the full parallel compression guide for the complete breakdown.
8. Do Your Panning and Spatialising
Every sound needs its own space in the stereo field. Keep the anchor elements — kick, snare, bass, lead vocals — dead centre. Pan everything else to create width and separation: rhythm guitars left and right, backing vocals spread, percussion offset. Good panning turns a flat, mono-ish mix into something that feels wide, immersive, and professional. For more on spatial mixing, see our guide on achieving separation in your mix.

9. Use Reverbs and Delays for Depth
Reverb and delay aren’t just effects — they create the space your mix lives in. Use them to push elements back in the mix (more reverb = further away) or to add width and interest. The golden rule: if you can barely hear the reverb, you’re probably using it correctly. Subtlety is key. Read our full guide on how to use reverb.
10. Don’t Start with a Messy Arrangement
This is the one most people overlook. No amount of mixing skill can save an overcrowded arrangement. Plan ahead. If two instruments are playing similar parts in the same frequency range, decide which one stays and which one goes — or re-arrange them to complement each other. Fewer, well-chosen parts always beat a wall of competing sounds. A clean arrangement practically mixes itself.
Take Your Mixing Further
These 10 rules are the foundation. If you want to go deeper — with video walkthroughs, real session breakdowns, and advanced techniques — check out The Official Guide to Mixing. It covers the full professional mixing process in 24 videos across 3 hours.
Already comfortable with mixing and want to level up your overall production? The Music Producer Gold Guide covers everything from arrangement to final master.